The image I used is ©Olivia, under licence from CILM.
Load the mask to your masks folder.
Open a new canvas, 800x800. We need it big to work with, we'll resize near the end.
Floodfill the canvas with white, and name this layer background. Open paper-7 and paste it
as a new layer. Apply the mask to this layer, with these settings:
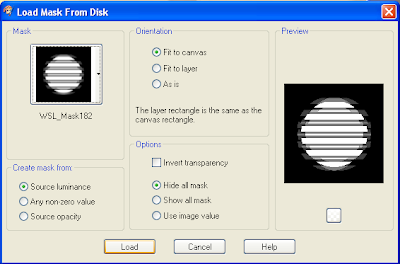
then merge group. Name this layer
mask.
Open rope-circle, and paste as a new layer. Open the cannon, resize by %80,
and paste as a new layer, placing it to the bottom right of the rope circle.
See my tag for placement.
Open your tube and copy and paste as a new layer.
Postion it to the far right of the rope circle, leaving only a small bit of the rope showing.
From my supplies, open the sand-layer and paste as a new layer. Move down below the rope circle and position. Open the sea-layer from my supplies and paste as a new layer below the sand layer, and move into position. Open the sand 2 layer and paste as a new layer on top of the rope circle layer, under the cannon layer.
Confused? Your layer pallette should look like this right now:
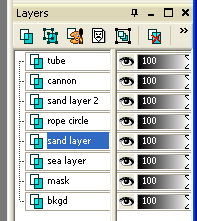
Open vine-2. Click onto the rope circle layer and paste the vine as a new layer. Move to the right top of the circle. I erased a portion of the vine stem that showed behind the tube at this point. Now open and paste as new layers all of the jungle elements that you want to add to the right side of the tag. Resize and erase bits as you need to. I used both of the palm trees, erasing the bananas and a lot of leaves, and then the diffenbachia and grass. I placed some grass between the sand layers, too, and then added the resized parrot to the top left on the vine.
Now open the beach & plant elements that you want to use on the bottom left side of the tag, resizing as needed, and pasting each as a new layer. Once you have everything into position, add a drop shadow of -2, -2, 50, 5, black and then 2, 2, 50, 5, black to every layer except the mask layer and the background layer.
Now close your bottom four layers, the background, the mask, the sea layer, and the sand layer. Click onto one of the open layers and merge>merge visable. Name this new merged layer
top. Now close this layer and reopen the other four layers. Click onto the sea layer and duplicate this layer twice, so that you have a total of three sea layers. Name them
sea-1,
sea-2, and
sea-3. On each sea layer, apply the Constellation plugin with these settings, hitting random seed for each layer:
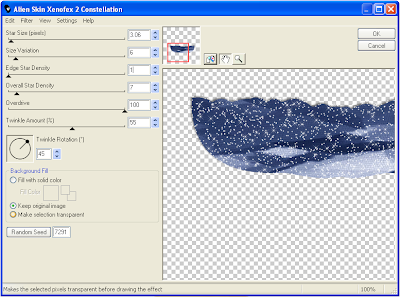
Now open the Pearl of the Seas element, copy it and past it as a new layer under your top layer, above the other layers, and resize it by %50, then resize agin by %80 and sharpen the image. Now hide it, and we're ready to begin. Hide sea-2 and sea-3 layers, and then merge visable. Copy this layer and paste it as a new animation in Animation Shop by right clicking anywhere on the screen. Back to psp, click the undo button, hide sea-1, open sea-2, merge visable. Copy this new layer, go back to Animation Shop, right click on your image and choose paste after current frame. Use this option to add each frame as you go. Back to psp, hit undo, hide sea-2, open sea-3, merge visable, copy & back to Animation shop, paste after current frame. Still in Animation Shop, go to Edit>Select All, the Edit>Copy and paste after current frame. You should now have six frames in Animation Shop.
Back to psp, click undo again, hide sea-3, reopen sea-1, and unhide the ship. Move the ship to the right of the tag, so that only a tiny bit of it shows behind your top layer. Grab the eraser tool and erase any bits of the ship that hang outside of the tag. Merge visable and copy to Animation Shop, pasting after current frame. Go back to psp, click undo to unmerge and then click undo once more to get the erased bits of the ship back. Now move the ship a little bit to the left, merge visable, copy & paste after current frame in Aniamation shop. Continue this way, remembering to alternate the sea levels each time you move the ship, until you have moved the ship completely off the left side of the tag.
Once you have the ship completely off the side, still in Animation Shop go to Edit>Select all then go to Animation>resize animation. Resizing by %75 will give you a 600x600 tag. If you want it smaller, make it smaller!
Now let's fix the animation speed. Go to Edit>Select all then go to Animation>Frame properties>Display time and change the number in the box to 20, then click Okay.
Now paste your copyright into Animation Shop as a new animation, then duplicate it until you have the same number of layers as you have in your tag. I have 29 layers in mine, so my copyright image needs to have 29 layers, too. Once you have it duplicated, go to Edit>select all, then Edit> copy. Now click onto the first frame in your tag, then go to Edit>select all, then to Edit>Paste>Into Selected Frame. Position your copyright where you want it and click it into place, and it will be on all layers. Now add your name to the tag the same way, and you're done!